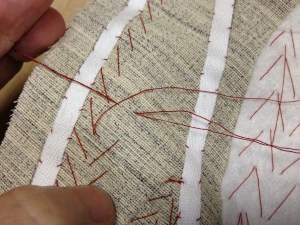
Pad stitching is awesome. It’s fantastic. It’s often replaced with fusible interfacings and spray-glue products, and that’s a darn shame. Because pad stitching is pretty nifty. It’s used to bond an infrastructure layer (traditionally hair canvas in tailoring) to the layer it’s stiffening (often the under-collar). And the great thing is, it provides MORE STRUCTURAL GLORY than the original infrastructure product can on its own. Beat that with a stick!
Here’s how ya do…


In a perfect world, you manage to get that single thread stitch to come up through your first stitch, which will completely lock everything in place. I find that that is more of a happy miracle than a reliable plan. Who knows? You might turn up to be one of so many gifted souls who are just plain better at this than I tend to be. If not, I feel your pain…. ;)
Incidentally, we are doing this to avoid the little lump a knot can leave. You’ll feel it in the finished work. And it will grate on your ever last nerve every time you notice it. And that is no good, because grating is for cheeses, not nerves. So we do this instead.
Once you can give your thread a bit of a tug and it no longer budges:


Ok, but seriously, missa, if it’s that freaking persnickety, why tag it a beginner-level skill?!?
Two reasons:
1) This is a pretty fundamental stitch. It is less complextical than a good pick stitch (which I don’t have a demo of, but it’s basically a backstitch with a limp… The stitch barely shows on the right side.)
2) You don’t need years of experience to see if you’re doing it right; just eyes. (I am told you really only need fingers. I have been doing this since 2007 – I still feel most comfortable flipping and checking at every stitch. I don’t do it often enough to be there yet. I feel no shame in that….)


A lot of students I have seen seem to prefer the horizontal method from the former photos. Do what works for you.

Actually, I think it’s a tension thing. Whatever the reason, I know it works, and you can’t bet it for control of a curve. Fusibles will not do this for you, my friends. You must pad stitch.
To change directions, take a 2-set thread stitch directly down/over from your work path. (Sorry; I was working on a shawl collar which proved rather assymetrical. I started and stopped a lot.)

You don’t want this to be perfect. Perfect patterns are discernible from the outside. Yes, it kills me a little, too. But it’s ok. All of this will be inside, and the important part is making sure no one is aware of it. Because if they are not aware, they can’t judge. And we don’t much cotton to the judgings, do we? Ok, well, I sure don’t….. ;)

So, while this is a fairly basic skill, it is one with many nuances. I like skills like that – they continue to be a challenge for years to come, and remind you that there is still more to learn about the absolute basics.

So. happy pad stitching!

Thank you SO much! This will be very useful!
So glad to help!
Thank you. Just beginning to try this out now.
Glad to help! I find pad stitching to be quite meditative. I hope your experience is similar.
Fab. What needle is used. Most companies sell combination. Not sure best one to buy.
Hi, Maggie – I would guess that I was using a size 10 gold-eye sharp in the tutorial. That is almost certainly the wrong needle, mind you, but they’re my favs. (I’m having a terribly time finding them lately, which makes me wish I had been better about not losing them over the years!). You want the thinnest needle you are comfortable with that is sturdy enough for the job, generally. I tend to prefer thinner needles to longer ones.
Hope that helps!
What’s the purpose of the twill tape? How is it positioned to accomplish that? Thank you.
Hi Linda – The twill tape helps the edge of the finished garment stay beautiful and turn better after sewing. It adds a little body to the edge. It serves a very similar function to understitching, but it’s invisible from outside. It is positioned just a hair inside the seam allowance – you want it as close to the edge as possible, but you don’t want to accidentally see through it when you put in the seam.
If this about the pad stitches, thank you ️