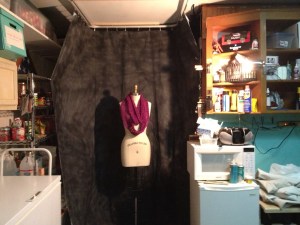
Ok, Internet, we need to talk something through… Remember back in the old days? Remember when it was all carefree fun and games? Oh, those wild younger days, when any old picture was a good picture? Put bodice on a hanger, chuck it on a closet door, and hey! Great! You put a picture on the interwebs! You contributed! This was back before the googles even searched images. Heck, we actually just called it “google”, back then, and there was a fight going on about whether to google or yahoo for searching. I feel ancient. Now it’s all “omg, use a neutral background when you photograph your demos!” (Oh, interwebs, did you forget that whole beggars/choosers dichotomy?) I’m not arguing that we should lower our standards. I am saying that not everyone has a professional photography setup just lying around, the space to dedicate to one, nor the money to get one. Since I’ve been Señorita Discount Home Improvement lately, I figured I could make a photography setup on the cheaps….
I used:
- Ikea’s Kvartal curtain system
- Riktig clips
- Stray 1″x2″ boards
- An old sheet
- Some spray paint (I used black and grey)
The Kvartal system has some chic little ceiling mounts. My Ikea was out of them, and a less than sympathetic employee told me which store had 900 in stock and I could drive there if I really needed them today. That’s awesome.
It turns out that you can also use any non-countersunk screw that fits in their upper track just fine. (That’s the dome topped screws, rather than the Y shaped ones.) I happened to have the right screws and nuts lying around (thanks, dad!), and little metal strapping bits with regularly spaced holes. (Oddly, I found the last bits on the garage ceiling 7′ from where I needed to use them.) If you don’t know a nut from a bolt, use the Ikea hardware. I would have, if it had been in stock. I’m lazy like that….
So, ideally, you want to put anything with weight into a stud. But sometimes (often) there isn’t a stud around you need one. This is where the stray 1x2s come in….

hmmmm… Should have turned the flash on there. Darn it, if only this were 10 years ago…. ;)

There are two rails because I plan to eventually have both a light and a dark colored backdrop.

For the record, I actually did iron the sheet first. It was just breezy out.


Ok, so you might be thinking to yourself, Gee, missa, why not start with a black sheet? Wouldn’t that be easier?
It wouldn’t be the same. The spray paint stiffens the thin fabric of the sheet and makes it hang like something sturdier.


No, that sheet is not hanging straight – it’s tacked to the wall on the right of the photo. On the left, I used a stray curtain clip to secure it to a shelf.

So, Internet, this is me trying to keep up with these ever-rising standards. I get that you could see glimpses of the real background though the old screen I used to use. I know it got you down. I don’t want that. I want you to be happy, Internet… I do. ;)
Yes. Yes. And yes! This is brilliant. My photos also suffer from a “lack of mannequin awesomeness,” but there is, as of yet, no easy, cheap cure for that one. :P
Simple and beautiful. As a representative of the Internet, I thank you.
I have been using a few yards of upholstery suede cloth for my back drops.
The textured matte surface does not reflect light, the fabric is washable if need be, and I can use different colors if I want. I currently use two types, a suede cloth knit and a stiffer cotton backed cloth. You can see the results in my Etsy shop photos, under DamselflyStudio.
Hi, Elizabeth – great suggestion! Thanks!